

How to create high available Kubernetes Cluster
In my previous post we learnt how to deploy a local kubernetes cluster for deveopment purpose. In this topic we will create a production grade kubernetes cluster. For a production like kubernetes cluster we need to make sure that it’s highly available. In this post we will create a high available kubernetes cluster using haproxy, keepalived for load balancer and k3s tool for kubernetes cluster.
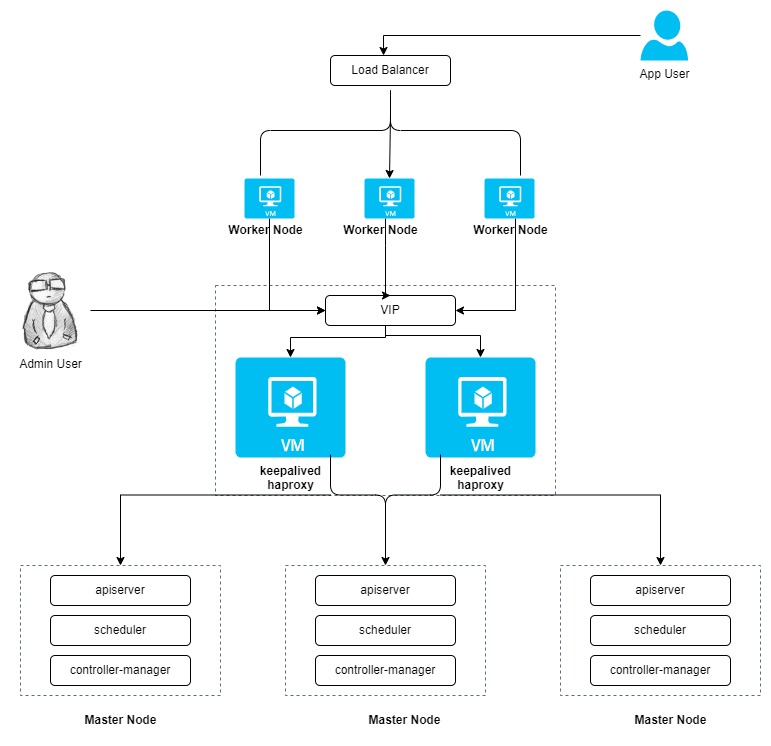
Cluster Architechture
Here will will create the cluster with 3 masters and three worker nodes, two nodes for load balancing and one virtual IP address. The virtual IP address in this example may also be called “a floating IP address”. That means in the event of node failures, the IP address can be passed between nodes allowing for failover, thus achieving high availability.
VM Requirements
| Sl. No. | Host Name | IP Address | Role |
|---|---|---|---|
| 1 | kube-controller-server-1 | 172.16.5.185 | Master |
| 2 | kube-controller-server-2 | 172.16.5.186 | Master |
| 3 | kube-controller-server-3 | 172.16.5.187 | Master |
| 4 | kube-worker-server-1 | 172.16.5.188 | Worker |
| 5 | kube-worker-server-2 | 172.16.5.189 | Worker |
| 6 | kube-worker-server-3 | 172.16.5.190 | Worker |
| 7 | kube-lb-server-1 | 172.16.5.191 | Load Balancer |
| 8 | kube-lb-server-2 | 172.16.5.192 | Load Balancer |
| 9 | VIP | 172.16.5.193 | Virtual IP |
Prepare the VM’s for Load balancer
Two VM’s will be configured as load balancer and will be placed in front of Kubernetes Master VM’s to route the traffic based on the availability. Load balancer will make sure to send the traffic if the master node is up and running to maintain the high availability of the master nodes.
Upgrade the system
Execute the below command to update and upgrade the system.
apt-get update && apt-get upgrade -y
Install haproxy and keepalived for load balancing and high availability.
Execute the below command to install keepalived and haproxy
apt install keepalived haproxy
systemctl restart haproxy
Configure IP forwarding and non-local binding
To enable Keepalived service to forward network packets to the backend servers, you need to enable IP forwarding. Run this command on both HAProxy servers;
sed -i 's/#net.ipv4.ip_forward=1/net.ipv4.ip_forward=1/' /etc/sysctl.conf
Similarly, you need to enable HAProxy and Keepalived to bind to non-local IP address, that is to bind to the failover IP address (Floating IP).
echo "net.ipv4.ip_nonlocal_bind = 1" >> /etc/sysctl.conf
Reload sysctl settings;
sysctl -p
Configure haproxy
The configuration of HAproxy is exactly the same on the two machines for load balancing. Run the following command to configure HAproxy.
vi /etc/haproxy/haproxy.cfg
Here is an example configuration for your reference (Pay attention to the server field. Note that 6443 is the apiserver port):
global
    log /dev/log  local0 warning
    chroot      /var/lib/haproxy
    pidfile     /var/run/haproxy.pid
    maxconn     4000
    user        haproxy
    group       haproxy
    daemon

   stats socket /var/lib/haproxy/stats

defaults
  log global
  option  httplog
  option  dontlognull
        timeout connect 5000
        timeout client 50000
        timeout server 50000

frontend kube-apiserver
  bind *:6443
  mode tcp
  option tcplog
  default_backend kube-apiserver

backend kube-apiserver
    mode tcp
    option tcplog
    option tcp-check
    balance roundrobin
    default-server inter 10s downinter 5s rise 2 fall 2 slowstart 60s maxconn 250 maxqueue 256 weight 100
    server kube-controller-server-1 172.16.5.185:6443 check # Replace the IP address with your own.
    server kube-controller-server-2 172.16.5.186:6443 check # Replace the IP address with your own.
    server kube-controller-server-3 172.16.5.187:6443 check # Replace the IP address with your own.
Save the file and run the following command to restart HAproxy.
systemctl restart haproxy
Make it persist through reboots:
systemctl enable haproxy
Make sure to configure the LB on the other VM as well.
Keepalived Configuration
Keepalived must be installed on both machines while the configuration of them is slightly different.
Run the following command to configure Keepalived.
vi /etc/keepalived/keepalived.conf
Here is an example configuration (lb1) for your reference:
global_defs {
  notification_email {
  }
  router_id LVS_DEVEL
  vrrp_skip_check_adv_addr
  vrrp_garp_interval 0
  vrrp_gna_interval 0
}

vrrp_script chk_haproxy {
  script "killall -0 haproxy"
  interval 2
  weight 2
}

vrrp_instance haproxy-vip {
  state BACKUP
  priority 100
  interface eth0                       # Network card name; excute `ip add` to get the name of the interface
  virtual_router_id 60
  advert_int 1
  authentication {
    auth_type PASS
    auth_pass 1111
  }
  unicast_src_ip 172.16.5.192      # The IP address of this machine
  unicast_peer {
    172.16.5.191                         # The IP address of peer machines
  }

  virtual_ipaddress {
    172.16.5.193/22                  # The VIP address
  }

  track_script {
    chk_haproxy
  }
}
Install k3s and start the Kubernetes cluster
To configure high availability for k3s it’s recomendated to have an odd number of servers for master nodes. In this post we will configure the masters with 3 VM’s.
Prepare the Master nodes and add to Cluster
To get started, first launch a server node with the --cluster-init flag to enable clustering, --node-taint flag will be used to not to run any workload on the master nodes and --tls-san flag to pass the virtual IP information to added in the certificates.
Execute the below command on the first Master node
curl -sfL https://get.k3s.io | sh -s - server --cluster-init --node-taint CriticalAddonsOnly=true:NoExecute --tls-san 172.16.5.193
Upon a successful exection of the above command you will be able to see the output like this:
ubuntu@kube-controller-server-1:~$ curl -sfL https://get.k3s.io | sh -s - server --cluster-init --node-taint CriticalAddonsOnly=true:NoExecute --tls-san 172.16.5.193
[INFO]  Finding release for channel stable
[INFO]  Using v1.23.8+k3s2 as release
[INFO]  Downloading hash https://github.com/k3s-io/k3s/releases/download/v1.23.8+k3s2/sha256sum-amd64.txt
[INFO]  Downloading binary https://github.com/k3s-io/k3s/releases/download/v1.23.8+k3s2/k3s
[INFO]  Verifying binary download
[INFO]  Installing k3s to /usr/local/bin/k3s
[INFO]  Skipping installation of SELinux RPM
[INFO]  Creating /usr/local/bin/kubectl symlink to k3s
[INFO]  Creating /usr/local/bin/crictl symlink to k3s
[INFO]  Creating /usr/local/bin/ctr symlink to k3s
[INFO]  Creating killall script /usr/local/bin/k3s-killall.sh
[INFO]  Creating uninstall script /usr/local/bin/k3s-uninstall.sh
[INFO]  env: Creating environment file /etc/systemd/system/k3s.service.env
[INFO]  systemd: Creating service file /etc/systemd/system/k3s.service
[INFO]  systemd: Enabling k3s unit
Created symlink /etc/systemd/system/multi-user.target.wants/k3s.service → /etc/systemd/system/k3s.service.
[INFO]  systemd: Starting k3s
ubuntu@kube-controller-server-1:~$
After adding the first master node to our cluster now it’s time add other master nodes to our cluster. To add the rest of the master node to our cluster we need the server token from the first master node. To Get the server token execute the below command on the first master node:
cat /var/lib/rancher/k3s/server/token
Now we have our server token that we will use in the below command for the value of the environment variable K3S_TOKEN. Please replace the value of yours. Execute the below command on rest of the master nodes:
curl -sfL https://get.k3s.io | K3S_TOKEN=K109b14fddfed986e06601e8c78532e7ec08f503d90209deb751caab1e4f98bf9d0::server:1070d4b8ab8bde36932c7c86128a8e40 sh -s - server --server https://172.16.5.193:6443 --node-taint CriticalAddonsOnly=true:NoExecute --tls-san 172.16.5.193
Output of the above command will be:
ubuntu@kube-controller-server-2:~$ curl -sfL https://get.k3s.io | K3S_TOKEN=K109b14fddfed986e06601e8c78532e7ec08f503d90209deb751caab1e4f98bf9d0::server:1070d4b8ab8bde36932c7c86128a8e40 sh -s - server --server https://172.16.5.193:6443 --node-taint CriticalAddonsOnly=true:NoExecute --tls-san 172.16.5.193
[INFO]  Finding release for channel stable
[INFO]  Using v1.23.8+k3s2 as release
[INFO]  Downloading hash https://github.com/k3s-io/k3s/releases/download/v1.23.8+k3s2/sha256sum-amd64.txt
[INFO]  Downloading binary https://github.com/k3s-io/k3s/releases/download/v1.23.8+k3s2/k3s
[INFO]  Verifying binary download
[INFO]  Installing k3s to /usr/local/bin/k3s
[INFO]  Skipping installation of SELinux RPM
[INFO]  Creating /usr/local/bin/kubectl symlink to k3s
[INFO]  Creating /usr/local/bin/crictl symlink to k3s
[INFO]  Creating /usr/local/bin/ctr symlink to k3s
[INFO]  Creating killall script /usr/local/bin/k3s-killall.sh
[INFO]  Creating uninstall script /usr/local/bin/k3s-uninstall.sh
[INFO]  env: Creating environment file /etc/systemd/system/k3s.service.env
[INFO]  systemd: Creating service file /etc/systemd/system/k3s.service
[INFO]  systemd: Enabling k3s unit
Created symlink /etc/systemd/system/multi-user.target.wants/k3s.service → /etc/systemd/system/k3s.service.
[INFO]  systemd: Starting k3s
ubuntu@kube-controller-server-2:~$
Interact with your cluster
By this time we have added all of our master nodes to our cluster. Now it’s time to check it using kubectl cli command. k3s tool will install the kubectl command line tool by default on all of the master nodes. Let’s execute the below command to get the node status:
ubuntu@kube-controller-server-3:~$ sudo kubectl get nodes
NAME                       STATUS   ROLES                       AGE   VERSION
kube-controller-server-1   Ready    control-plane,etcd,master   72m   v1.23.8+k3s2
kube-controller-server-2   Ready    control-plane,etcd,master   14m   v1.23.8+k3s2
kube-controller-server-3   Ready    control-plane,etcd,master   8m    v1.23.8+k3s2
ubuntu@kube-controller-server-3:~$
You can see in the above output that we have now 3 master nodes added to our kubernetes cluster.
Prepare Agent nodes and add them to the cluster
Now it’s time to add the agent nodes to the kubernets cluster; after adding all the master nodes. To add the agent nodes we need the token from any of the above master nodes. To get the agent token execute the below command on any of the master:
sudo cat /var/lib/rancher/k3s/server/node-token
Execute the command to add the node to the cluster:
curl -sfL https://get.k3s.io | K3S_URL=https://172.16.5.193:6443 K3S_TOKEN=K109b14fddfed986e06601e8c78532e7ec08f503d90209deb751caab1e4f98bf9d0::server:1070d4b8ab8bde36932c7c86128a8e40 sh -
Once you are done adding all the worker nodes you can execute the below command to check / validate our cluster status.
ubuntu@kube-controller-server-1:~$ sudo k3s kubectl get nodes
NAME                       STATUS   ROLES                       AGE     VERSION
kube-controller-server-1   Ready    control-plane,etcd,master   120m    v1.23.8+k3s2
kube-controller-server-2   Ready    control-plane,etcd,master   61m     v1.23.8+k3s2
kube-controller-server-3   Ready    control-plane,etcd,master   55m     v1.23.8+k3s2
kube-worker-server-1       Ready    <none>                      32m     v1.23.8+k3s2
kube-worker-server-2       Ready    <none>                      5m58s   v1.23.8+k3s2
kube-worker-server-3       Ready    <none>                      16s     v1.23.8+k3s2
ubuntu@kube-controller-server-1:~$
As you can see in the above output, that we have now all the master nodes and agent nodes connected to our cluster. Now it’s time to test our cluster by deploying an application. Let’s deploy a sample application to our newly created cluster to validate everything is working as expected. For the validation purpose we will deploy a nginx webserver and we will use metalb as the load balancer.
Cluster Validation
Deploy the sample application by following the below steps:
Step 1 : Install MetalLB
Install MetalLB using the official manifests by MetalLB
kubectl apply -f https://raw.githubusercontent.com/metallb/metallb/v0.10.2/manifests/namespace.yaml
kubectl apply -f https://raw.githubusercontent.com/metallb/metallb/v0.10.2/manifests/metallb.yaml
Step 2 : Create ConfigMap for MetalLB
Next you need to create ConfigMap, which includes an IP address range for the load balancer. The pool of IPs must be dedicated to MetalLB’s use. Create the ConfigMap named metallb-configmap.yaml and deploy it using the command kubectl apply -f metallb-configmap.yaml
apiVersion: v1
kind: ConfigMap
metadata:
  namespace: metallb-system
  name: config
data:
  config: |
    address-pools:
    - name: default
      protocol: layer2
      addresses:
      - <ip-address-range-start>-<ip-address-range-stop>
Step 3 : Deploy an example application (web server) with a load balancer
Create a deployment file named web_lb.yaml with below content and deploy it using command kubectl apply -f web_lb.yaml
apiVersion: v1
kind: Namespace
metadata:
  name: web
---
apiVersion: apps/v1
kind: Deployment
metadata:
  name: web-server
  namespace: web
spec:
  selector:
    matchLabels:
      app: web
  template:
    metadata:
      labels:
        app: web
    spec:
      containers:
      - name: httpd
        image: httpd:2.4.48-alpine3.14
        ports:
        - containerPort: 80
---
apiVersion: v1
kind: Service
metadata:
  name: web-server-service
  namespace: web
spec:
  selector:
    app: web
  ports:
    - protocol: TCP
      port: 80
      targetPort: 80
  type: LoadBalancer
Step 4 : Check your LoadBalancer
Run the following command to see your LoadBalancer with the external-ip and port.
kubectl get service -n web
Step 5 : Access your example application
Now access the Private IP in your web browser and you should be able to see It works! page.

Comments